

Creating a project estimate with Wrike
In all honesty, we haven’t found any product that is perfect for our management needs, but Wrike gets us the closest. It’s great at building out project timelines, managing timelines and reporting status, but it’s missing a key piece of project planning: building out the actual project cost.
Wrike is a project planning and management tool, similar to Asana or ClickUp if you’re familiar with those platforms. Over the past few years we have researched and implemented many other tools, from Basecamp to Jira (we’ll save that review post for another day), but what we like best about Wrike is that it allows the entire team multiple ways to view and manipulate project data.
No plan survives first contact.
In all honesty, we haven’t found any product that is perfect for our management needs, but Wrike gets us the closest. It’s great at building out project timelines, managing timelines and reporting status, but it’s missing a key piece of project planning: building out the actual project cost.
Just try searching for “creating a project budget in Wrike.” You won’t discover a simple product detail page in your search results; instead, the top results are all on the help portal. This is great because it means there is no shortage of help out there… but it’s also challenging because there isn’t an obvious “how-to” protocol in terms of estimating budgets and allocating time and cost. (The other tools in our research are missing this feature too — so Wrike isn’t alone. Harvest, for example, has great reporting and time tracking features, and has even added a new forecast tool. But, alas, Harvest lacks the ability to simply associate time with a task. Sigh.)
BUDGETING = AWARENESS*(*And who doesn’t want that?)
-Carl Richards, The New York Times
We’re pretty accustomed to encountering roadblocks and creating work-arounds in our daily client work, and approached budgeting with Wrike the same way: we created our own process.
It’s been tremendously useful for us, and we thought it may be helpful for other companies using this tool as well, so we’re sharing our own “how-to” here.
In this post, we’ll walk you through:
• Basic Project Structure
• Setting up a project
• Exporting the project data
• Running calculations
Okay… let’s begin!
Basic Product Structure
To create a project estimate, we use a simple formula:
Project budget = series of tasks with hours
Task hours = duration × allocation
Task budget = rate × task hours
(Note: Wrike recently introduced a new feature in Workload called “Effort.” This is really handy and something we use throughout our projects, but at the initiation of a project we prefer to have our effort be dynamic, based on the above formula. Otherwise, we would have to hardcode those hours manually.)
Let’s go over some quick definitions to make sure we’re all on the same page, and then we’ll get into the tools.
Task: What is the task at hand? (content strategy, design direction, development, etc.)
FTE: The number of people associated with the task (fairly straightforward, the people that will need to work on said task)
Duration: How long will the task at hand take? (8 hours 8 days Etc.)
Allocation: What is the percentage of time for the team? (This accounts for the fact that while we may have people assigned to a project over a certain time duration, the tasks do not always take up a full schedule for an individual.)
Setting up a project
1. If you’re not already logged into Wrike, now’s the time… In Wrike, click on the green “+” button and . create a folder; select table view so you can add custom columns for Allocation and FTE
a. Set Allocation to use % data type
b. Set FTE to use number data type
.png)
2. Begin adding your tasks: Name of task, dates, FTE, allocation percentage
3. Once they have all been added, look at the Gantt chart view to add dependencies. (Example: refined wireframes would be dependent on client review and feedback, so if that date is pushed out, the due date for the refined wireframes will be pushed out as well.) Now we have a fairly basic set of data. We can flip into different views and start including dependencies, but it’s not critical for this conversation.
4. From here, we need to determine what the cost will be based on the formula above. Unfortunately, as we explained, Wrike does not have that capability. To fill the gap, we have begun exporting our project plans from Wrike into Numbers.
Exporting the Plan
Once the project plan has been created, select “Table” mode to view the details.
(Note: Do not use “New Table” in Wrike because it currently exports all columns and it formats the allocation as Numbers instead of Percentages.)
Opening the project in Numbers:
In the upper right-hand corner of Wrike, click on the ellipsis and choose “Export,” followed by “Excel.” Download and open the file using Numbers or Excel. Now as a design-focused shop we prefer Numbers because it has some softer features than Excel (it allows you to kern the type), but either app will work.
(Note: If you have the New Table format enabled from Wrike Labs you will need to turn this off because it strips the percentage datatype and exports all column types, regardless if they are turned on.)
With the file open in Numbers or Excel (if you must), here we will add three new columns.
• Hours
• Rate
• Budget
In creating estimates, you won’t need the “Status” or “Assigned To” data, so those columns can be removed. ?
Running calculations
Calculating Hours
Hours are not exported and will need to be calculated based on the Duration, FTE and Allocation. At the top of the hours column, add the number 8 (for 8 hours) on the very top row for the following calculation:
STRIPDURATION* (FTE * ALLOCATION* 8 ) = HOURS
Example:
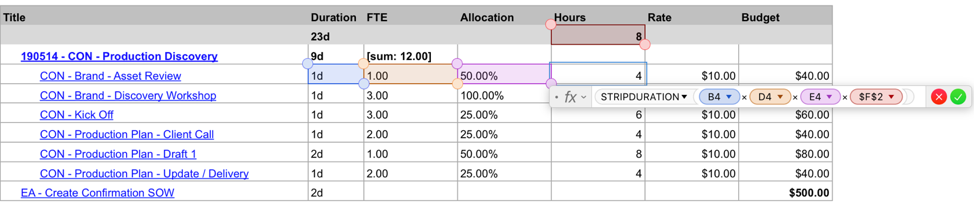
Be sure to preserve the number 8 column and row on the calculation so you can continue the same calculation for each task in the project plan.
Calculating Budget
HOURS × RATE = BUDGET
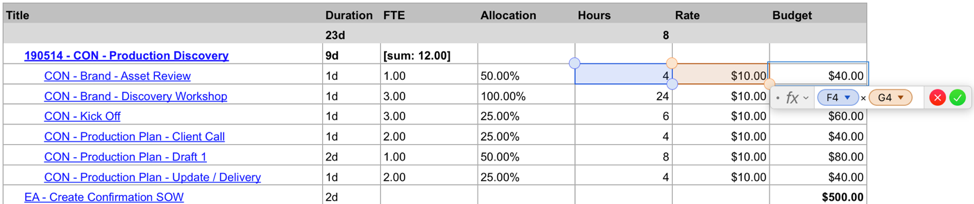
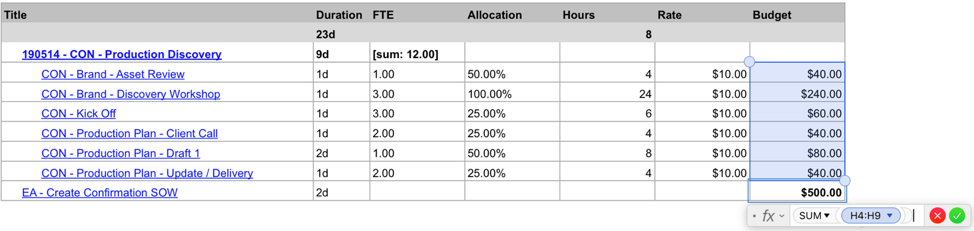
Follow the same equation for each task and add the total at the bottom of the page to determine the cost for each task in the project.
Add the total costs for each task and the sum will equal the project total:
And that’s about it! Except for a few other considerations…
If you made a mistake in the project plan or you need to adjust the numbers, you will need to re-export and re-calculate. This is horrible.
If you decide you would like to use the “Effort” feature, we recommend only turning this on when you are kicking off the project and assigning people. We’re not sure what’s going on, but it has only been calculating the correct number of hours for Effort the first time the column is included in the project. (No idea why; it’s a new feature.)
And if there are other issues you are running into or new solutions you’ve been thinking about, send us an email or DM over twitter.
Happy planning!